Pages

Friday, November 12, 2010

Stepping Back - A Halloween Layout


Unlike many of you who scrapbook, I have a hard time remembering (or finding the time) to scrapbook photos I've taken if too much time has passed. I thought I'd take a quick break from all of my Christmas projects, and create a layout for my favorite Halloween pictures from last month.

I have to admit one thing though...I haven't printed those photos yet, so I for the time being, I Photoshopped them onto the layout.

My boyfriend and I didn't plan on dressing up for Halloween, but when we were invited to his brother's Halloween party, we figured it would be fun to throw together some costumes. I did a little research online, and learned how to create fairly realistic wounds out of liquid latex and makeup. I think we made convincing zombies, don't you?

I used a few fun supplies to put together this layout. 

Bazzill Cardstock
My Mind's Eye Haunted Collection
Tim Holtz Clear Stamps -
Nature's Elements
Tim Holtz Stamps -
Odds and Ends
Tim Holtz Stamps -
Good Thoughts
Tim Holtz Die -
Ticket Strip
Rusty Pickle Stamps
Ranger's Archival Ink - Jet Black
Tim Holtz Distress Ink - Black Soot
Tim Holtz Distress Ink - Aged Mahogany
Tim Holtz Paper Distresser


Thursday, November 11, 2010

Giant Santa Tag: Another Tutorial


Last night, I had the WORST case of crafter's creative block you could imagine. I was sitting in front of tons of awesome Christmas paper, and more paper crafting supplies than I knew what to do with, and couldn't think of any way to use them...that is until my wonderful boyfriend came to my rescue. Keep in mind that while he appreciates all of the things that I'm able to create, this man has absolutely no interest in crafting whatsoever. He knows how much I love making tags, so he pitched his idea of using an extra large tag, strips of the My Mind's Eye Holly Jolly collection that I love so much, my favorite Distress Ink (Walnut Stain of course), and my stamps. He even insisted on red fibers at the top! Isn't it great! I don't know what I'd do without him :-D

Here's a quick tutorial:


Start by covering a #8 manilla tag, like these from Ranger, with the My Mind's Eye Holly Jolly - Holly Berries paper. I used Claudine Hellmuth Studio Multi Medium to secure the paper to the tag. Works wonderfully!


Apply more Studio Multi Medium to two more patterns of paper, and apply them to the tag at an angle. Distress the edges of the added papers by tearing them before the Multi Medium dries completely. Work quickly, or it'll be stuck for good :)

Distress the edges of the tag with the Tim Holtz Paper Distresser, and ink the edges with Walnut Stain Distress Ink.


Blend Stormy Sky Distress Ink into the blue paper, and Aged Mahogany Distress Ink into the red and slightly into the blue. Use Ranger's Jet Black Archival Ink to stamp your favorite santa onto the blue snowflake paper. Use a scrap piece of paper to mask off the edge of the red paper if you're worried about your santa stamp getting on that area.


Using Aged Mahogany Distress Ink, create a watermark effect by stamping on the red paper. You can also stamp various flourishes and script stamps with Archival Ink or Distress Inks all over the tag to create a Christmas collage effect.

Cover the entire tag with Rock Candy Stickles for a vintage glass look, and either allow to dry or dry with a heat tool. The Stickles will slightly feather the Distress Inks, but the Archival Ink won't budge - makes for a great effect! Add red fibers or ribbon to the top to finish it off!

Well, whatta you think? Wasn't his idea great? Leave us a comment and let us know what you thought.

Happy soon to come holidays!

Wednesday, November 10, 2010

First Santa of the Season!

Hello!

I am definitely starting to feel the holiday season approaching, and LOVE it! I've been working tons with the December kit from Club Ruby, which is absolutely amazing! If you're interested in joining the awesome Club Ruby community, head over there and sign up!

I thought I'd post a quick Christmas card tutorial to kick off my favorite season of the year!


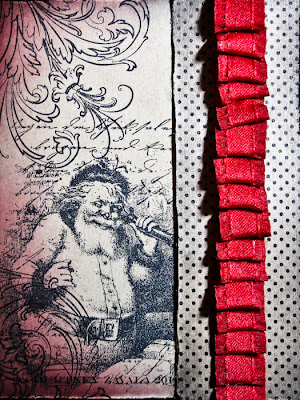
This card is quick and easy, features my favorite Bo Bunny Santa stamp and my Tim Holtz Fab Flourish  stamp, and an eye-catching ribbon pleat!

Here goes:


1) Start with a standard A2 kraft card base. Using Ranger's Jet Black Archival Ink to layer Christmas stamps on the left side of the card.


2) Cut a 1.5x5.25 strip of the My Mind's Eye Haunted Collection. Distress the edges with a paper distresser and ink the edges with Black Soot Distress Ink. Adhere the strip to the right side of the card.


3) Pleat and adhere ribbon down the center of the My Mind's Eye paper. Lightly ink the two left corners of the card with Aged Mahogany Distress Ink.

There you go! A fun and simple card!

I hope everyone is starting to get into the holiday spirit. Check back for more holiday crafts!